
Firebase integration in Flutter app (Android and iOS)
In this tutorial, I will explain how to integrate your flutter project with Firebase with some simple steps.

Firebase Console
1. Go to firebase console https://console.firebase.google.com
2. Click on Go to Console at the top right of your window, make sure you are logged in with the Gmail account.
3. Click on Add project.
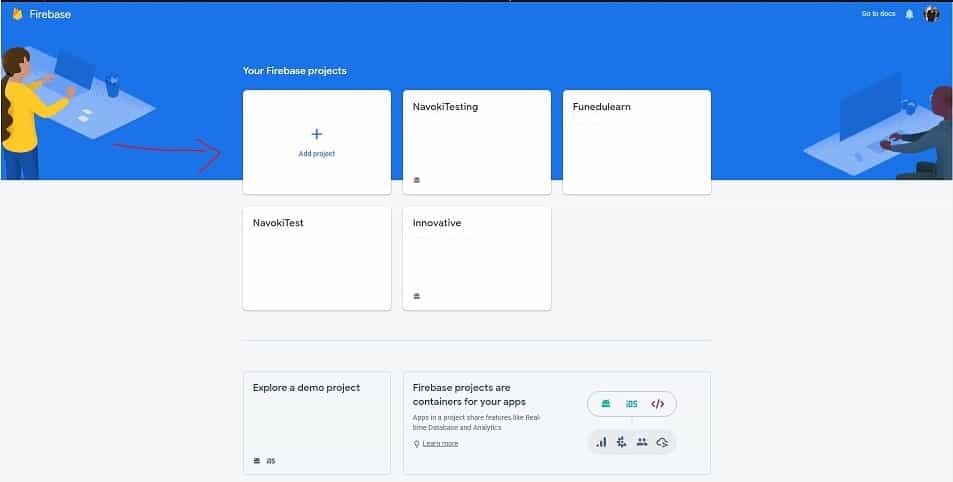
4. Enter the name of your project. Then click continue. After your project is created on the firebase console now start to configure it with a flutter app.
First, Firebase needs to be set up on both native platforms.
Setup Android project
5. Click on the android icon to add android project, a popup will open.
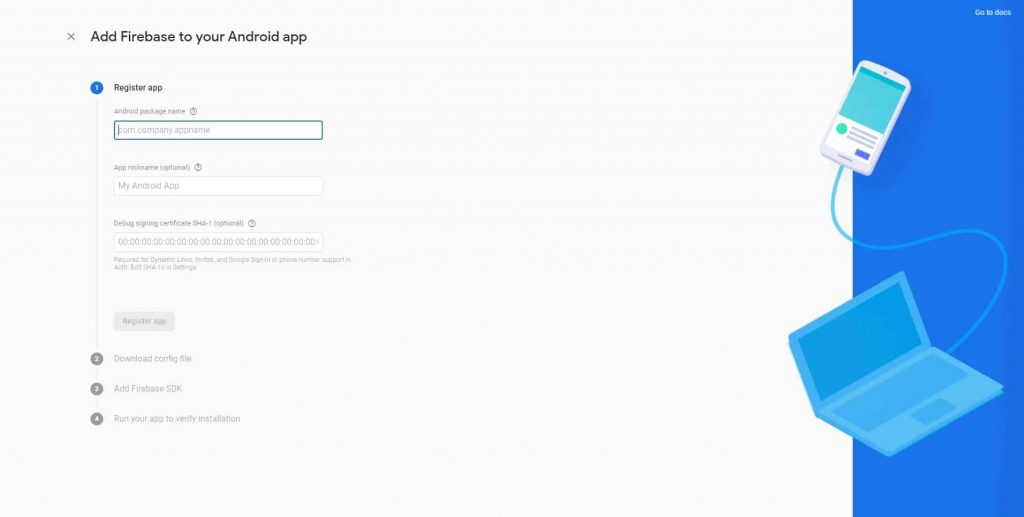
6. Enter <your package name> if you don’t know your package name just go to <your_project>/android/app /src/main/AndroidManifest.xml , you can see your project at the top left on your window it looks like com.examples.projectName.
7. Enter your SHA-1, and then click on Register app. if you don’t know how to get it just go to this link. This will use debug.keystore to generate SHA-1 which for testing/development purposes only. When you will publish your app you have to create new <name>.keystore file to get new SHA-1 and add it in the android app in Project Settings–> Add fingerprint.
8. Next, you will be asked to download a file google-services.json, just download it and paste in <your_project>/android/app. Remember don’t change the name of this file and also paste it on the correct location else project will not run.
9. Next, you see some dependency copy it and paste these lines on a given on exact location then click Next. This will be added in <your_project>/android/build.gradle file.
buildscript {
  repositories {
    // Add the following line:
    google()  // Google's Maven repository
  }
  dependencies {
    // Add the following line:
    classpath 'com.google.gms:google-services:4.3.3'  // Google Services plugin
  }
}
allprojects {
  repositories {
    // Add the following line:
    google()
  }
}
and this below line of code will be added in <your_project>/android/app/build.gradle
// Add the following line:
apply plugin: 'com.google.gms.google-services'  // Google Services plugin
android {
}
Now you Firebase integration with android app is complete to use different features of Firebase you have to add dependencies of each feature separately. You can get all dependencies from here.

If you have any problem with the related topics just ask me to comment section below.
Setup iOS project
10. Click on the iOS icon to add iOS project, a popup will open.
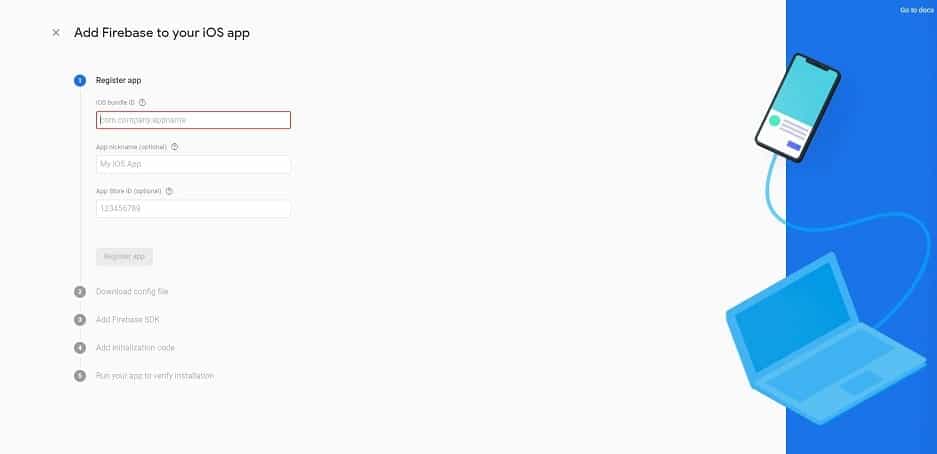
11. Enter Bundle Id from your XCode Project. Open <project-name>/iosof your flutter project in XCode to check this.
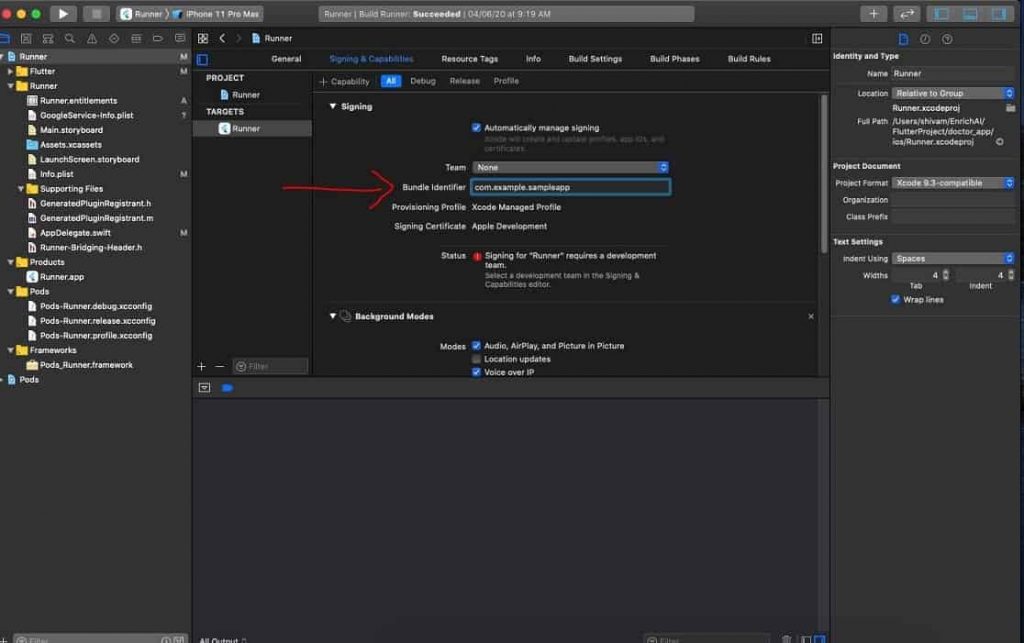
12. Download the GoogleService-Info.plist file and move it to your project as shown below.
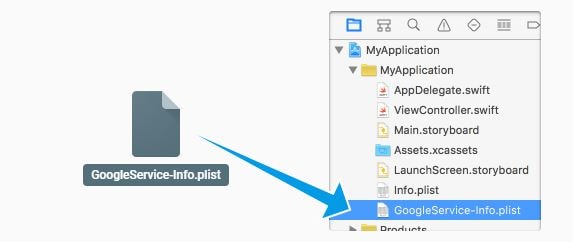
13. Open Terminal on path <project-name>/ios and run this code.
pod init
14. Open Podfile and add this line for Firebase analytics
pod 'Firebase/Analytics'
You have to add Pods for each Firebase feature, You can get a list for all here
15. After adding Pods run this command. This creates a.xcworkspace file for your app. Use this file for all future development on your application.
pod install
16. Now in your AppDelegate class add this import at the top import Firebase
17. In the same file add this FirebaseApp.configure() line in the same way as mentioned.
  override func application(
    _ application: UIApplication,
    didFinishLaunchingWithOptions launchOptions: [UIApplication.LaunchOptionsKey: Any]?
  ) -> Bool {

    FirebaseApp.configure() // add here

    GeneratedPluginRegistrant.register(with: self) // above this line
    return super.application(application, didFinishLaunchingWithOptions: launchOptions)
  }

Now your firebase integration is COMPLETE.
Remember! for each feature you have to add libraries at each native end, the rest of your logic will be on the flutter app. Also, you have to add packages for each feature in flutter pubspec.yaml file, for example
  dependencies:
  firebase_auth: ^0.16.1
  firebase_messaging: ^6.0.16
Thank you for reading till the end. now what to do next? you can experiment with more firebase feature by following our videos and blogs at navoki.com some of the links are below

