Flutter Custom Font
Introduction
In this article, I’ll explain all the steps, in brief, to know how to include your own font in the Flutter project, and also make a sample project and apply some fonts on Text Widgets. So don’t skip any point to better understanding. This article helps you a lot to make your Flutter app more attractive and good looking.
Let’s Begin

Import the font files
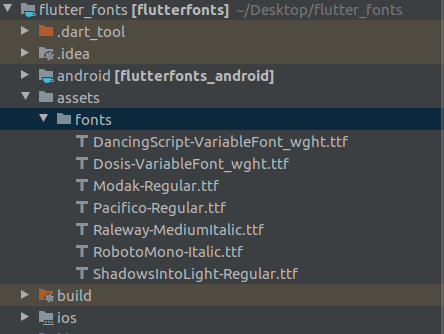
First, you need to download fonts for use in the project, you can download the fonts from www.fonts.google.com. Now you need to import the font files into the project. I am putting my font files inside assets/ fonts folder you change the directory name.

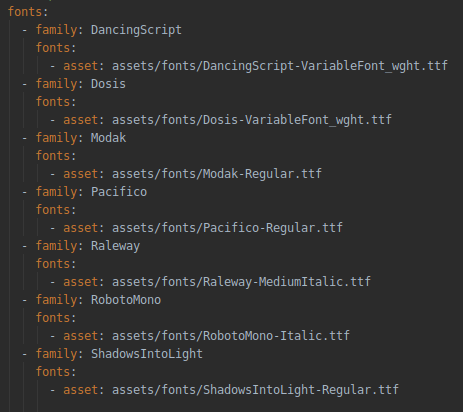
Mention the font in the
pubspec.yaml

Now we are ready to code for UI components. I am using simple Text Widgets. You also can use other properties of the Text Widget, it will not reflect your font and work fine.
main.dart
Make sure value you provided to fontFamily must match the family a name declared in the pubspec.yaml file, else the font not reflected in your project.
Column(
          mainAxisAlignment: MainAxisAlignment.spaceEvenly,
          crossAxisAlignment: CrossAxisAlignment.center,
          children: [
            Text(
              "DancingScript-VariableFont_wght",
              style: TextStyle(fontFamily: 'DancingScript', fontSize: 20),
            ),
            Text(
              "Dosis-VariableFont_wght",
              style: TextStyle(fontFamily: 'Dosis', fontSize: 20),
            ),
            Text(
              "Modak-Regular",
              style: TextStyle(fontFamily: 'Modak', fontSize: 20),
            ),
            Text(
              "Pacifico-Regular",
              style: TextStyle(fontFamily: 'Pacifico', fontSize: 20),
            ),
            Text(
              "Raleway-MediumItalic",
              style: TextStyle(fontFamily: 'Raleway', fontSize: 20),
            ),
            Text(
              "RobotoMono-Italic",
              style: TextStyle(fontFamily: 'RobotoMono', fontSize: 20),
            ),
            Text(
              "ShadowsIntoLight-Regular",
              style: TextStyle(fontFamily: 'ShadowsIntoLight', fontSize: 20),
            ),
          ],
        ),
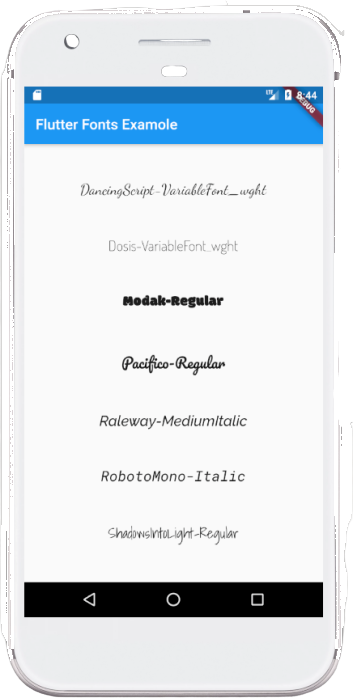
Now run the project.

Get the complete source code on Github.
If you have any queries related to this article, ask me freely in the comment section below.


